Contents
Installation Guide
OneDDI 3.5.1
Introduction
The VendorN Ltd OneDDI product (OneDDI) is a centralised software application which hosts several modules. The Vision module provides long-term access to DNS activity history. The ReDNS module allows service owners to control their DNS records. The IPMeye module provides centralised remote power management and console access using the IPMI protocol. The SerialEyes module provides centralised remote physical serial port access via non-dedicated hardware.
This document details the necessary steps to install, upgrade and uninstall the OneDDI application.
OneDDI consists of the following installable components:
- Master - Core OneDDI application, required for all modules
- Sensor - Component used by the Vision module to collect, aggregate and alert on DNS activity from various supported sources, at least one sensor is required by the Vision module
- Agent - Windows agent used to forward DNS activity, collected from the DNS diagnostic logging feature of the Windows DNS server, to a OneDDI sensor, required for the Vision module when collecting data for Windows DNS servers
This document contains a section for the installation, upgrade and uninstallation for each of the above components.
When upgrading OneDDI, components should be upgraded in the following order:
- The OneDDI Master
- All OneDDI sensors - If the Vision module is being used
- All OneDDI agents - If the Vision module is being used
When using Vision, once OneDDI has been deployed, the following documents can asist in the integration of Vision with DNS servers:
Deployment Architecture
Available Architectures
Available deployment architectures will depend on serveral factors:
- If a single point of failure is acceptable or not
- If the OneDDI Vision module is being used
- If so, how busy the environment is
The table below provides a summary of the available deployment architectures. VendorN support will provide guidance on which architecture is best as no two organizations are the same.
NOTE When using the Vision module, deployment architecture depends on total aggregate messages per second (MPS) from all integrated DNS servers which is both DNS queries and responses combined, if only DNS responses are being logged and sent to a OneDDI Sensor then MPS will be responses per second:
| ID | Description | When to use | Pros | Cons |
|---|---|---|---|---|
| 1 | Standalone OneDDI Master | Use when NOT using the Vision module, and a single point of failure is acceptable | Lower device footprint | Longer recovery time and some data loss in the event of disaster recovery depending on how up-to-date a backup is |
| 2 | Active/Standby OneDDI Masters | Use when NOT using the Vision module, and a single point of failure is NOT acceptable | Minimal recovery time and no data loss in the event of disaster recovery | Larger device footprint |
| 3 | Standalone OneDDI Master with a single colocated Sensor | Use when using the Vision module, a single point of failure is acceptable, and total average MPS is less than 10,000 | Lowest device footprint | Longer recovery time and some data loss in the event of disaster recovery depending on how up-to-date a backup is, not for busy environments |
| 4 | Active/Standby OneDDI Masters each with a colocated Sensor | Use when using the Vision module, a single point of failure is NOT acceptable, and total average MPS is less than 10,000 | Minimal recovery time and no data loss in the event of disaster recovery, lower device footprint | Not for busy environments |
| 5 | Standalone OneDDI Master with separate Sensors | Use when using the Vision module, a single point of failure is acceptable, and total average MPS is more than 10,000 | For busy environments | Longer recovery time and some data loss in the event of disaster recovery depending on how up-to-date a backup is, larger device footprint |
| 6 | Active/Standby OneDDI Masters with separate Sensors | Use when using the Vision module, a single point of failure is NOT acceptable, and total average MPS is more than 10,000 | Minimal recovery time and no data loss in the event of disaster recovery, for busy environments | Largest device footprint |
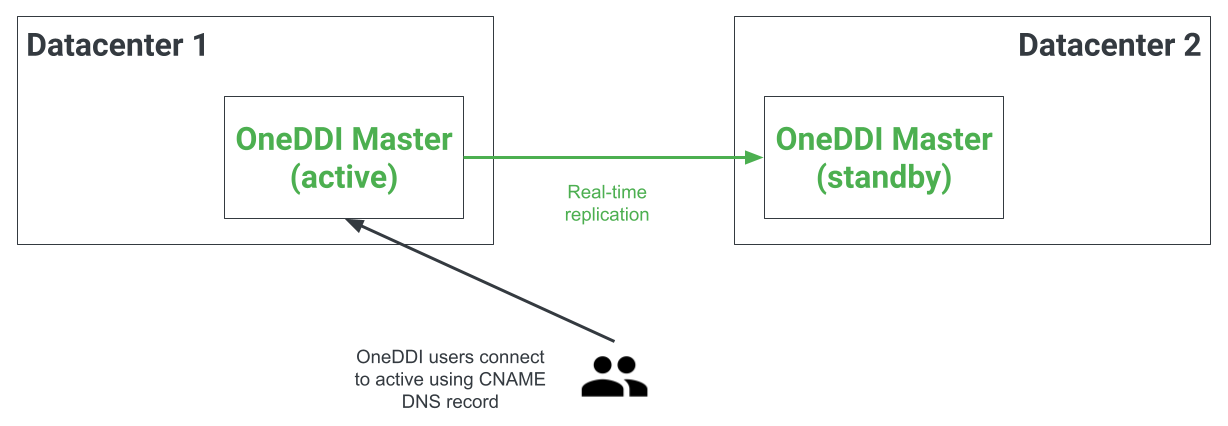
Example: Architecture 2
In this architecture OneDDI is made redundant using two OneDDI Masters which are paired in an active/standby relationship. Changes to the active OneDDI Master are replicated in close to real-time to the standby OneDDI Master. In the event the active is offline the standby can be promoted to active. 2 devices are required for this architecture which can be physical or virtual.
The following figure illustrates the deployment architecture:
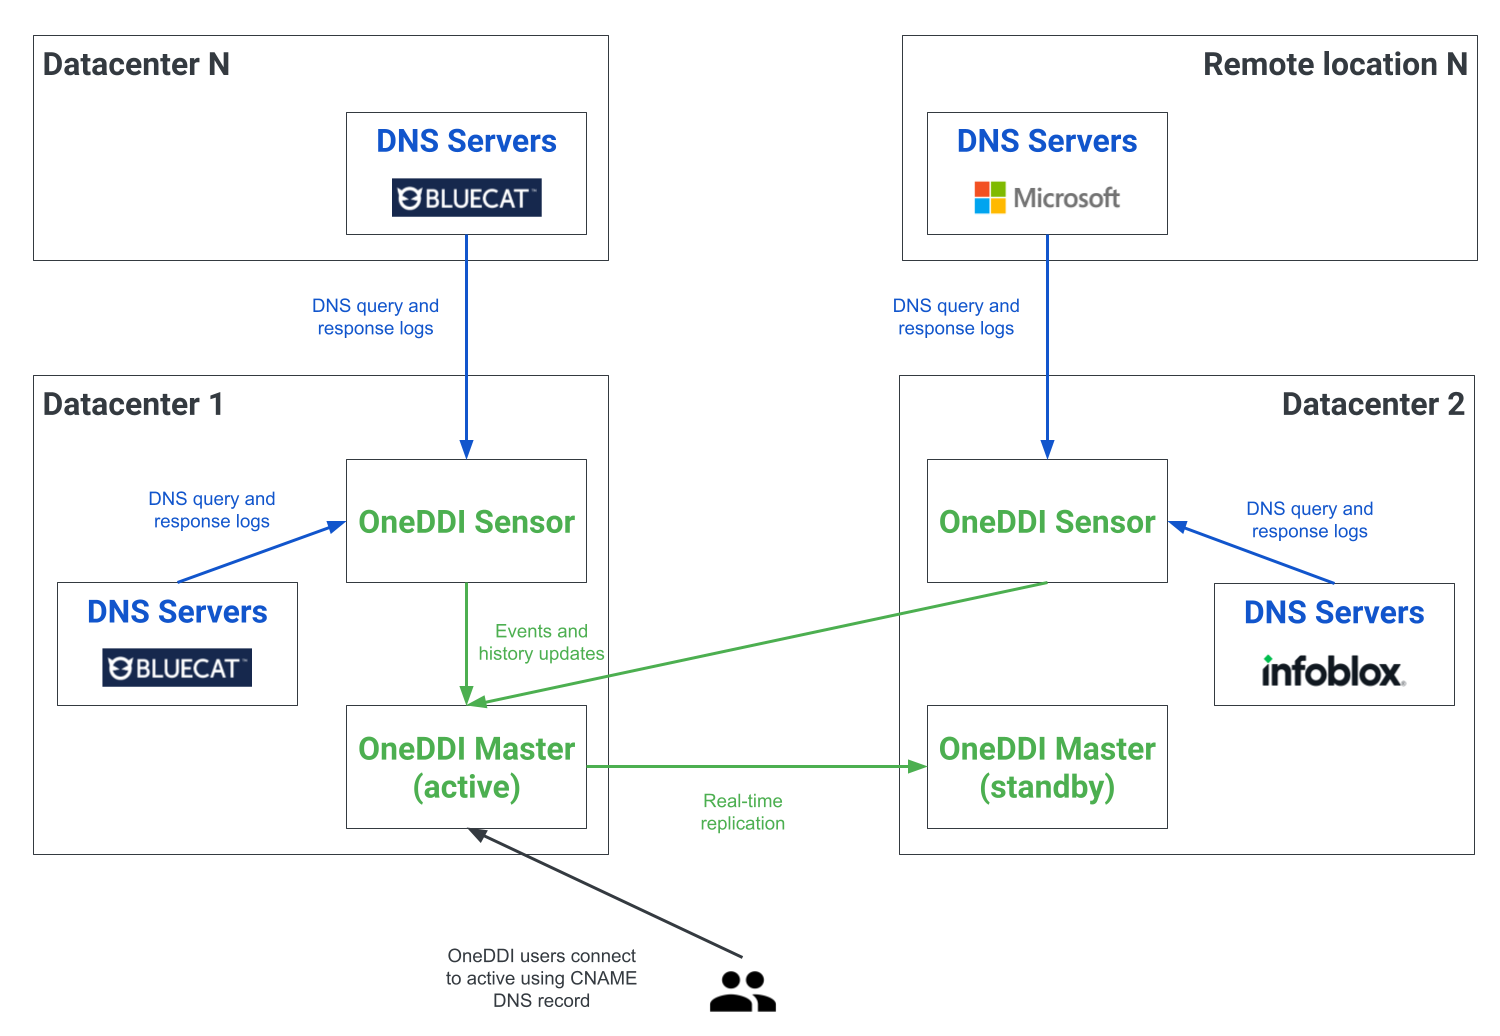
Example: Architecture 6
In this architecture OneDDI is made redundant using two OneDDI Masters which are paired in an active/standby relationship and, and two OneDDI Sensors are used to provide Sensor redundancy. Changes to the active OneDDI Master are replicated in close to real-time to the standby OneDDI Master. In the event the active is offline the standby can be promoted to active. OneDDI Sensors are stateless components, in the event a Sensor is offline DNS servers can send their logs to another OneDDI Sensor. At least 4 devices are required for this architecture which can be physical or virtual.
The following figure illustrates the deployment architecture:
Firewall Requirements
Overview
Firewall requirements are broken into sections for core requirements and the requirements for each OneDDI module. Review the core requirements and then the requirements for each licensed OneDDI module to determine complete firewall requirements.
Core OneDDI Firewall Requirements
The following illustrates communication paths for OneDDI:
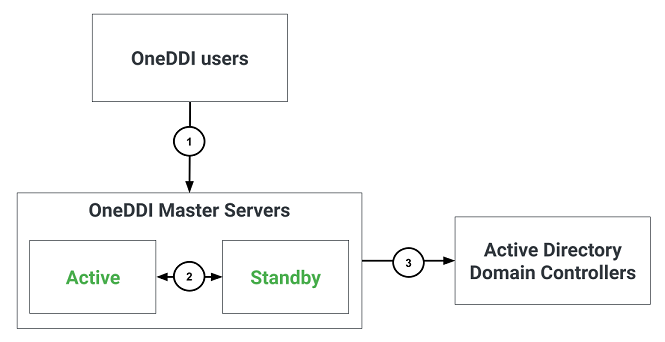
The following table identifies firewall requirements for each communication path, their use and if they are optional:
| No. | Description | Required? | Source host | Destination host | Destination port |
|---|---|---|---|---|---|
| 1 | OneDDI user interface and API access using HTTPS | Yes | Devices which users will use to access OneDDI | All OneDDI Master servers | TCP port 443 |
| 2 | Real-time replication between two OneDDI Master servers | Only if real-time replication is required | All OneDDI Master servers | All OneDDI Master servers | TCP port 443 |
| 3 | Active Directory integration for authentication and group assignment using LDAPS | Only if Active Directory integration is required | All OneDDI Master servers | The Active Directory Domain Controllers which OneDDI will be configured to explicitely use | TCP port 636 |
NOTE In All cases the source port is ephemeral.
Vision Firewall Requirements
The following illustrates additional communication paths when using the Vision module:
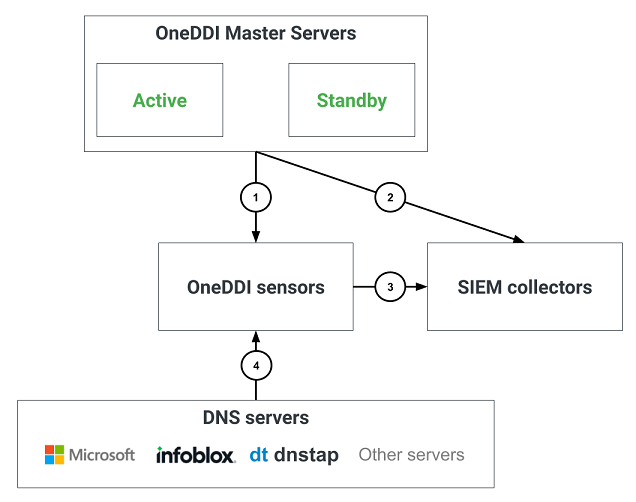
The following table identifies firewall requirements for each communication path, their use and if they are optional:
| No. | Description | Required? | Source host | Destination host | Destination port |
|---|---|---|---|---|---|
| 1 | Internal communication with OneDDI Sensors using HTTPS | Yes | All OneDDI Master servers | All OneDDI Sensors | TCP port 444 |
| 2 | SIEM integration for DNS activity events | Only if SIEM integration is required | All OneDDI Master servers | The SIEM collector servers which OneDDI Master servers will be configured to explicitely use | TCP port to be determined by SIEM adminstrators |
| 3 | SIEM integration for DNS activity forwarding | Only if SIEM integration is required | All OneDDI Sensors | The SIEM collector servers which OneDDI Sensors will be configured to explicitely use | TCP port to be determined by SIEM adminstrators |
| 4 | DNS query and response logs from DNS servers | Yes | All DNS servers | All OneDDI Sensors | Ports will depend on DNS server types OneDDI will integrate with (see the DNS Servers & Vision Deployment Guide to determine which ports are required) |
ReDNS Firewall Requirements
The following illustrates additional communication paths when using the ReDNS module:
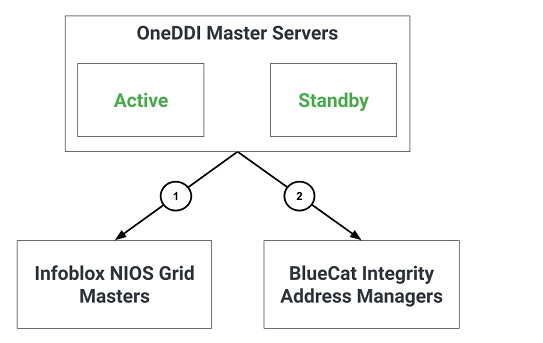
The following table identifies firewall requirements for each communication path, their use and if they are optional:
| No. | Description | Required? | Source host | Destination host | Destination port |
|---|---|---|---|---|---|
| 1 | Connections to the Infoblox NIOS API using HTTPS | Only if integrating ReDNS with Infoblox NIOS | All OneDDI Master servers | Infoblox NIOS Grid Master (also the Grid Master Candidate if Infoblox NIOS redundancy is being used) | TCP port 443 |
| 2 | Connections to the BlueCat Integrity API using HTTPS | Only if integrating ReDNS with BlueCat Integrity | All OneDDI Master servers | BlueCat Integrity Address Manager (also the Standby Address Manager if BlueCat Integrity redundancy is being used) | TCP port 443 |
IPMeye Firewall Requirements
The following illustrates additional communication paths when using the IPMeye module:
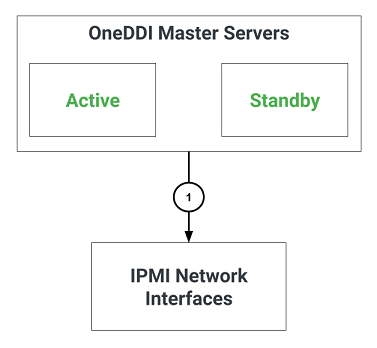
The following table identifies firewall requirements for each communication path, their use and if they are optional:
| No. | Description | Required? | Source host | Destination host | Destination port |
|---|---|---|---|---|---|
| 1 | Connections to Infoblox NIOS devices with LOM network interfaces using the IPMI protocol | Yes | All OneDDI Master servers | Infoblox NIOS device LOM network addresses | UDP port 623 |
OneDDI Master
Requirements
OneDDI requires a product license to operate. An evaluation license can be requested by sending an email to VendorN, quoting the company name. Two product licenses exist, an “enterprise” and a “standalone” license. The enterprise license is unrestricted. The standalone license does not permit management of the real-time replication feature and only permits management of one OneDDI sensor. Once a license has been obtained, following installation the license is applied via the OneDDI user interface.
The OneDDI Master is currently tested on 64bit Red Hat/CentOS 7, 8 and 9 systems.
OneDDI integrates with both the BlueCat Integrity and Infoblox NIOS DNS, DHCP and IP address management (DDI) platforms. For Infoblox, OneDDI utilises the Infoblox API which is versioned e.g. /wapi/<version>/.... OneDDI is tested with an Infoblox API version of at least 2.0. For BlueCat, OneDDI utilises the RESTful V2 API available in Address Manager 9.5 and onwards.
When using the Vision module, the following is a recommended minimum hardware configuration (if the OneDDI Sensor is colocated with the OneDDI Master theses requirements remain the same and both the Master and Sensor will share resources):
- At least 8 CPU cores
- 16GB RAM
- 2TB disk space
When NOT using the Vision module, the following is a recommended minimum hardware configuration:
- At least 4 CPU cores
- 4GB RAM
- 20GB disk space
Either physical or virtual hardware can be used for production deployments in both cases.
Installation
The OneDDI Master installer is named oneddi-<version>-1.x86_64.rpm - where <version> is the version being installed. This program should be transferred to a temporary location on the target server. The following steps can then be used to install the OneDDI Master:
-
If using the IPMeye module, the OneDDI Master uses tools provided by the
ipmitoolRed Hat package, use the following command to install this package:sudo yum install ipmitool -
The OneDDI Master uses tools provided by the
sqliteRed Hat package, use the following command to install this package:sudo yum install sqlite -
Create the
oneddiuser - the OneDDI Master will run as this user once started:sudo useradd oneddi -
Use the following command to install the OneDDI Master:
sudo yum install oneddi-<version>-1.x86_64.rpm -
Following installation, the OneDDI Master will be installed as a system service and started, and will listen on TCP port 443. If a local firewall is running it may require an update to permit TCP port 443 connections to the application. For example, when using firewalld, commands similar to the following may be used:
sudo firewall-cmd --add-port=443/tcp --permanent sudo firewall-cmd --reload -
Verify the web user interface can be accessed using the following URL:
https://<ip-address-or-hostname> -
If a OneDDI license has been obtained it can now be applied via the OneDDI user interface.
Following the installation the default user admin will exist with the default password of OneDDI!. This user will have full permissions associated to manage all features of OneDDI and can be used for initial setup of the system.
Upgrade
Unless otherwise specified all versions of OneDDI are backwards compatible with all previous versions. That is, any newer version can be installed over the top of any older version. No version is forwards compatible though, and an older version cannot be installed over the top of a newer version.
The main OneDDI Master is compatible with older OneDDI sensors. Currently no constraints are made on which sensor versions OneDDI Master support.
During an upgrade when replication is configured the active and standby peer databases can have different and incompatible schemas. Therefore, to upgrade a replication pair the replication relationship must be broken, i.e. replication must be deconfigured before the upgrade is performed. Once the upgrade is complete on both the active and standby peers replication can then be reconfigured.
Before an upgrade a backup of the application database should be taken by following the steps in the Redundancy / Backup & Restore section in the Admin Guide.
The OneDDI installer is named oneddi-<version>-1.x86_64.rpm - where <version> is the version of OneDDI being installed. This program should be transferred to a temporary location on the target server. The following steps can then be used to upgrade OneDDI:
- If replication is configured deconfigure replication.
-
Use the following command to uninstall the existing OneDDI version - note that all data and configuration will NOT be removed by this command and it will remain under the
/opt/oneddidirectory once removed, this will then be used by the new version once installed:sudo yum remove oneddi -
Use the following command to install the OneDDI Master:
sudo yum install oneddi-<version>-1.x86_64.rpm -
Verify the web user interface can be accessed using the following URL:
https://<ip-address-or-hostname>
If replication was deconfigured to perform the upgrade replication can be reconfigured again if both the active and standby peer have been upgraded.
Uninstallation
The following steps can then be used to uninstall the OneDDI Master:
-
Use the following command to uninstall the OneDDI Master:
sudo yum remove oneddi -
During the initial installation of OneDDI the
oneddiuser will have been created for the OneDDI web server. If theoneddiuser is no longer required remove the user using the following command:sudo userdel -r oneddi -
If a local firewall is running, and it was updated to permit TCP port 443 connections to the web server, it may require an update to no longer allow TCP port 443 connections. For example, when using firewalld, commands similar to the following may be used:
sudo firewall-cmd --remove-port=443/tcp --permanent
sudo firewall-cmd --reload
Following uninstallation all data and configuration files specific to the host will still be located under the /opt/oneddi directory. If the data and configuration files are no longer required they can be removed using the following command:
sudo rm -r /opt/oneddi
OneDDI Sensor
Requirements
The OneDDI sensor is currently tested on 64bit Red Hat/CentOS 7, 8 and 9 systems.
Hardware requirements will depend on DNS query and response volume processed by the sensor. The following table identifies the minimum recommend hardware based on total aggregate messages per second (MPS) from all integrated DNS servers which is both DNS queries and responses combined, if only DNS responses are being logged and sent to a OneDDI Sensor then MPS will be responses per second:
| MPS | CPU cores | RAM | Disk space |
|---|---|---|---|
| Up to 10,000 | 8 | 8GB | 50GB |
| Over 10,000 | 8 | 16GB | 100GB |
NOTE Disk space is used to cache data in the case of an error communicating back to the OneDDI Master. The sensor does not store any data which needs to be backed up.
Either physical or virtual hardware can be used for production deployments in all cases.
Installation
The OneDDI sensor installer is named oneddi-sensor-<version>-1.x86_64.rpm - where <version> is the version being installed. This program should be transferred to a temporary location on the target server. The following steps can then be used to install the OneDDI sensor:
-
The OneDDI Sensor uses tools provided by the
sqliteRed Hat package, use the following command to install this package:sudo yum install sqlite -
Create the
oneddiuser - the OneDDI sensor will run as this user once started:sudo useradd oneddi -
Use the following command to install the OneDDI sensor:
sudo yum install oneddi-sensor-<version>-1.x86_64.rpm -
Following installation, the OneDDI sensor will be installed as a system service and started, and will listen on TCP port 444. If a local firewall is running it may require an update to permit TCP port 444 connections to the sensor. For example, when using firewalld, commands similar to the following may be used:
sudo firewall-cmd --add-port=444/tcp --permanent sudo firewall-cmd --reload -
Depending on the DNS actvity data collection methods which will be used to send data to the sensor, other firewall updates will also be required in the case a firewall is used. More examples are given below using firewalld for the supported methods:
# Windows OneDDI agent:
sudo firewall-cmd --add-port=8100/tcp --permanent

# Opensource dnstap:
sudo firewall-cmd --add-port=6000/tcp --permanent

# BlueCat HTTP:
sudo firewall-cmd --add-port=8443/tcp --permanent

# Infoblox data connector:
sudo firewall-cmd --add-port=8022/tcp --permanent

# Infoblox and ISC BIND syslog:
sudo firewall-cmd --add-port=8514/tcp --permanent

# Final reload
sudo firewall-cmd --reload
Following initial installation a sensor will have generated a unique connection key which is used when adding the sensor to the OneDDI user interface. This key is stored in the /opt/oneddi-sensor/config/http-connection.key file. When the sensor is added to the OneDDI user interface this connection key will be changed automatically.
Upgrade
Unless otherwise specified all versions of OneDDI are backwards compatible with all previous versions. That is, any newer version can be installed over the top of any older version. No version is forwards compatible though, and an older version cannot be installed over the top of a newer version.
The main OneDDI application is compatible with older OneDDI sensors. Currently no constraints are made on which sensor versions OneDDI applications support.
Additionally, OneDDI sensors are compatible with older OneDDI agents. Currently no constraints are made on which agent versions OneDDI sensors support.
The OneDDI sensor installer is named oneddi-sensor-<version>-1.x86_64.rpm - where <version> is the version of the OneDDI sensor being installed. This program should be transferred to a temporary location on the target server. The following steps can then be used to upgrade the OneDDI sensor:
-
Use the following command to uninstall the existing OneDDI sensor version - note that all data and configuration will NOT be removed by this command and it will remain under the
/opt/oneddi-sensordirectory once removed, this will then be used by the new version once installed:sudo yum remove oneddi-sensor -
Use the following command to install the OneDDI sensor:
sudo yum install oneddi-sensor-<version>-1.x86_64.rpm
Uninstallation
The following steps can then be used to uninstall the OneDDI sensor:
-
Use the following command to uninstall the OneDDI sensor:
sudo yum remove oneddi-sensor -
During the initial installation of the OneDDI sensor the
oneddiuser will have been created for the OneDDI sensor. If theoneddiuser is no longer required remove the user using the following command:sudo userdel -r oneddi -
If a local firewall is running, and it was updated to permit TCP port 444 connections to the sensor, it may require an update to no longer allow TCP port 444 connections. For example, when using firewalld, commands similar to the following may be used:
sudo firewall-cmd --remove-port=444/tcp --permanent sudo firewall-cmd --reload -
Additionally, any firewall rules added to permit specific DNS activity collection methods will also need to be removed. For example, when using firewalld:
# Windows OneDDI agent:
sudo firewall-cmd --remove-port=8100/tcp --permanent

# Opensource dnstap:
sudo firewall-cmd --remove-port=6000/tcp --permanent

# BlueCat HTTP:
sudo firewall-cmd --remove-port=8443/tcp --permanent

# Infoblox data connector:
sudo firewall-cmd --remove-port=8022/tcp --permanent

# Infoblox and ISC BIND syslog:
sudo firewall-cmd --remove-port=8514/tcp --permanent

# Final reload
sudo firewall-cmd --reload
Following uninstallation all data and configuration files specific to the host will still be located under the /opt/oneddi-sensor directory. If the data and configuration files are no longer required they can be removed using the following command:
sudo rm -r /opt/oneddi-sensor
OneDDI Agent
Requirements
The OneDDI agent is currently tested on 64bit Windows 2012 R2, 2016, 2019 and 2022 systems.
Since the OneDDI agent will be installed on DNS servers it does not have any hardware requirements. The OneDDI agent:
- Has a small footprint - It consumes less that 1MB for its installation and log files, it does not write any data to disk and operates purely out of memory.
- Uses a fixed specified amount of memory - The agent operates an in memory circular queue of messages it sends to a OneDDI sensor. The size of this queue is configurable in the
config\agent.configfile in the installation directory and defaults to 100MB. For servers with higher throughput, or more available memory, this can be increased. - Does not require high privileges - It only needs to be able to read the DNS server Windows Event Logs.
- Does not use an automated installer - Files are provided as a ZIP archive with an installation PowerShell script so that it can be deployed using software management solutions.
Either physical or virtual hardware can be used for production deployments.
Installation
The OneDDI agent installer is named oneddi-agent-<version>.zip - where <version> is the version being installed. The ZIP file, when unzipped, contains a directory named oneddi-agent.
This file should be transferred to a temporary location on the target server. The following steps can then be used to install the OneDDI agent:
- Unzip the
oneddi-agent-<version>.zipfile. - Move the resulting
oneddi-agentdirectory to the parent installation directory, i.e.c:\Program Files\. - Open a command window and change to the installation directory, i.e.
c:\Program Files\oneddi-agent. -
Use the following command to create the default configuration file and install and start the OneDDI agent Windows Service, following this the OneDDI agent Windows Service will be running:
powershell scripts\Install.ps1 -
Edit the
config\agent.configfile under the installation directory and specify the IP address of the OneDDI sensor the agent will forward DNS activity to, note that multiple OneDDI sensors can be specified for redundancy and the first connected sensor will be used:# Default queue size queue-size 104857600 # Automtically failover to second sensor when first is lost target 1.1.1.1:8100 target 2.2.2.2:8100 - If changes were made to the
config\agent.configfile under the installation directory, restart the OneDDI agent Windows Service. - The DNS server can then be added to OneDDI within the OneDDI user interface.
Upgrade
Unless otherwise specified all versions of OneDDI are backwards compatible with all previous versions. That is, any newer version can be installed over the top of any older version. No version is forwards compatible though, and an older version cannot be installed over the top of a newer version.
OneDDI sensors are compatible with older OneDDI agents. Currently no constraints are made on which agent versions OneDDI sensors support.
The OneDDI agent installer is named oneddi-agent-<version>.zip - where <version> is the version being installed. The ZIP file, when unzipped, contains a directory named oneddi-agent.
This file should be transferred to a temporary location on the target server. The following steps can then be used to upgrade the OneDDI agent:
- Open a command window and change to the installation directory, i.e.
c:\Program Files\oneddi-agent. -
Use the following command to stop and uninstall the OneDDI agent Windows Service - this will not remove any files or directories:
powershell scripts\Uninstall.ps1 - Unzip the
oneddi-agent-<version>.zipfile. - Move the resulting
oneddi-agentdirectory to the parent installation directory, i.e.c:\Program Files\, over the top of the existingoneddi-agentdirectory, confirming when prompted to overwrite all the existing files. -
Use the following command to install and start the OneDDI agent Windows Service, following this the OneDDI agent Windows Service will be running:
powershell scripts\Install.ps1
Uninstallation
The following steps can then be used to uninstall the OneDDI sensor:
- Open a command window and change to the installation directory, i.e.
c:\Program Files\oneddi-agent. -
Use the following command to stop and uninstall the OneDDI agent Windows Service - this will not remove any files or directories:
powershell scripts\Uninstall.ps1 - Close the command window.
Following uninstallation all data and configuration files specific to the host will still be located under the installation directory, i.e. c:\Program Files\oneddi-agent. If the data and configuration files are no longer required they can be removed.