Contents
Infoblox NIOS & Vision Deployment Guide
Integrations latest-release
Introduction
Infoblox NIOS and VendorN Vision work together in providing organizations long-term access to enterprise DNS query history, providing an instant and unparalleled view of DNS data and context.
Vision receives DNS query and response logs from Infoblox NIOS Grid DNS servers. It aggregates and stores this data while also optionally sending events and aggregated DNS data to an organizations SIEM. An organization can also use its SOAR and other systems to query the Vision API to access DNS activity history data.
When sending data to Vision, NIOS has a comprehensive suite of features which can be used, these are identified in the following figure:
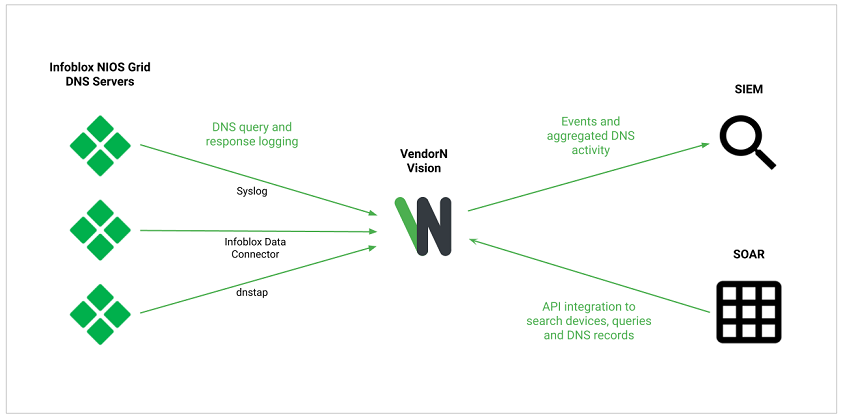
The Configuration section contains a sub-section documenting how each of these methods are configured in the Infoblox NIOS platform.
Configuration
Syslog
With the Syslog method, NIOS Grid DNS servers are configured to forward their Syslog’s to a Vision Sensor and query and response logging is enabled on the DNS servers.
To configure the Syslog method in Infoblox NIOS use the following steps:
-
Once the Infoblox NIOS user interface has been accessed navigate to the Grid / Grid Manager / Members page:
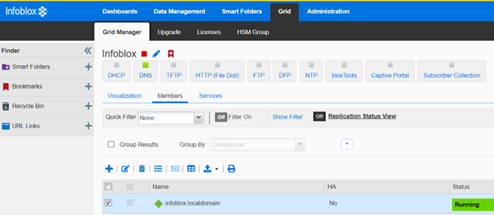
-
Select a member and click the “edit” button displayed in the table toolbar to edit the member properties:
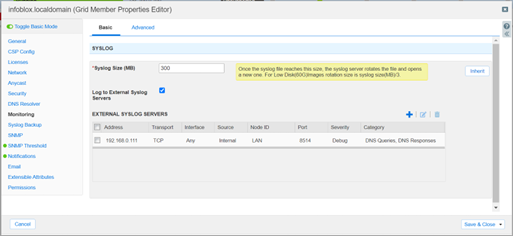
- Under the Monitoring / Basic tab make the following changes and save and close the dialog:
- Check the “Log to External Syslog Servers” checkbox.
- Add a Vision Sensor under the “EXTERNAL SYSLOG SERVERS” table, ensuring TCP port 8514 is specified and ensure “Category” is set to “DNS Queries” and “DNS Responses”.
-
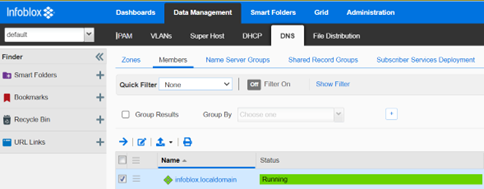
Next, navigate to the Data Management / DNS / Members page:

-
Select a member and click the “edit” button displayed in the table toolbar to edit the member DNS properties:
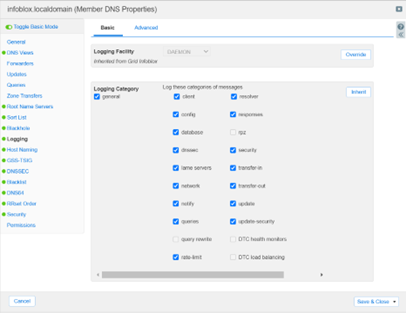
- Under the Logging / Basic tab make the following changes and then save and close the dialog:
- Check the “queries” checkbox.
- Check the “responses” checkbox.
- Once saved a service restart of the DNS server will be required for the changes to take effect.
Following this, NIOS Grid DNS servers will log query and response messages to their local Syslog which is then forwarded to the Vision Sensor in real-time.
Infoblox Data Connector
With the Infoblox Data Connector method, NIOS Grid DNS servers are configured to periodically send files to a Vision Sensor which contain similar query and response messages to the Syslog method but using SCP.
To configure the Infoblox Data Connector method in Infoblox NIOS use the following steps:
-
Once the Infoblox NIOS user interface has been accessed navigate to the Data Management / DNS / Members page:
-
Select a member and click the “edit” button displayed in the table toolbar to edit the member DNS properties:
- Under the Logging / Advanced tab make the following changes and then save and close the dialog:
- Check the “Capture DNS Queries” checkbox.
- Check the “Capture DNS Responses” checkbox.
- Check the “Capture queries/responses for all domains” radio button.
- Uncheck the “Retain captured queries/replies to the local disk” checkbox.
- Set “Export to” to “SCP”.
- Set “TCP port” to “8022”.
- Set “Directory Path” to “/”.
- Set “Server Address” to be the Vision Sensors IP address.
- Set “Username” and “Password” to ignored – the Vision Sensor will refuse connections from devices it has not been configured with, the username and password specified is ignored by the sensor.
- Once saved a service restart of the DNS server will be required for the changes to take effect.
Following this, NIOS Grid DNS servers will log query and response messages to a local file which is then forwarded to a Vision Sensor periodically.
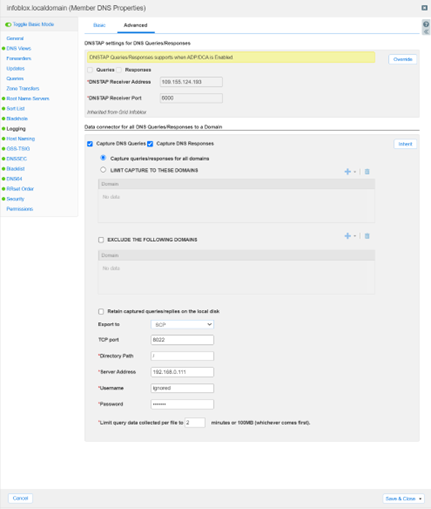
DNSTAP
With the dnstap method, NIOS Grid DNS Servers are configured to forward DNS queries and responses to a Vision Sensor using the dnstap protocol. To configure the dnstap method in Infoblox NIOS use the following steps:
-
Once the Infoblox NIOS user interface has been accessed navigate to the Data Management / DNS / Members page:

-
Select a member and click the “edit” button displayed in the table toolbar to edit the member DNS properties:
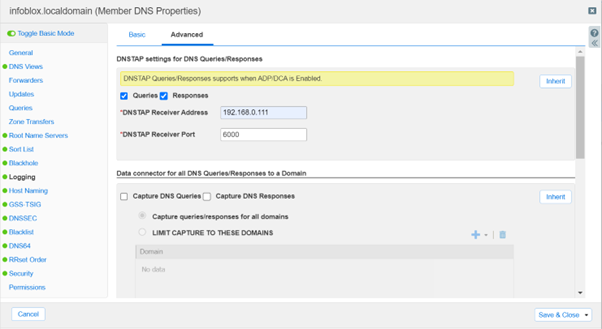
- Under the Logging / Advanced tab make the following changes and then save and close the dialog:
- Check the “Queries” checkbox.
- Check the “Responses” checkbox.
- Set “DNSTAP Receiver Address” to the Vision Sensors IP address.
- Set “DNSTAP Receiver Port” to “6000”.
- Once saved a service restart of the DNS server will be required for the changes to take effect.
Following this, NIOS Grid DNS servers will send DNS query and response messages to a Vision Sensor in real-time.